How to create a Benchmark Package with Swift
I want to share the process of setting up a benchmark package in Swift, which I have used for my recent line ranges benchmark. This step by step guide comes with the following prerequisites:
- You know how to use a terminal and command line tools
- You have installed the Swift command line tools (verify with
swift --version) - You know how to write code in Swift (the basics are enough)
Apart from that I will try to explain everything to the best of my abilities and after reading this post you will be able to create and run your own benchmarks.
Step 1: Creating the Package
To create a Swift package from the command line navigate to the directory of your choice and create a new folder for the package. In this example I will name it Tutorial: mkdir Tutorial followed by cd Tutorial to move into the newly created package folder. Now it is time to instruct the Swift command line tool to create a new executable package because we want the ability to run the benchmark from the terminal. To create an executable package run swift package init --type executable. The command line tool will create the following folders and files:
.
├── Package.swift
├── README.md
├── Sources
│   └── Tutorial
│       └── Tutorial.swift
└── Tests
    └── TutorialTests
└── TutorialTests.swiftswift package init --type executable.
README.mdis meant as an introduction file for other users. Useful for when you want to publish your source code.Sources/Tutorial/Tutorial.swiftis the main Swift file for the executable. It contains the main method that will be called when the executable is run.Tests/TutorialTests/TutorialTests.swiftis for unit tests. For a benchmark it can be ignored.Package.swiftcontains the package description, build targets, and dependencies.
The file to focus on first is Package.swift as the necessary dependencies for the benchmark need to be added. At the moment the file should contain the following:
// swift-tools-version: 5.7
// The swift-tools-version declares the minimum version of Swift required to build this package.

import PackageDescription

let package = Package(
    name: "Tutorial",
    dependencies: [
        // Dependencies declare other packages that this package depends on.
        // .package(url: /* package url */, from: "1.0.0"),
    ],
    targets: [
        // Targets are the basic building blocks of a package. A target can define a module or a test suite.
        // Targets can depend on other targets in this package, and on products in packages this package depends on.
        .executableTarget(
            name: "Tutorial",
            dependencies: []),
        .testTarget(
            name: "TutorialTests",
            dependencies: ["Tutorial"]),
    ]
)
You need to add a new package dependency to swift-collections-benchmark which is the benchmark framework I am going to use in this tutorial. This benchmark package was created to measure performance of swift collections, hence the name collections-benchmark, but it can be used for all other kinds of benchmarks. To add this package as a dependency insert a new .package entry into the first dependencies array, similar to the example comment:
// ... Beginning of file omitted ...

let package = Package(
    name: "Tutorial",
    dependencies: [
        // Dependencies declare other packages that this package depends on.
        .package(url: "https://github.com/apple/swift-collections-benchmark", from: "0.0.3"),
    ],
    targets: [

 // ... Rest of file omitted ...
However, that is not all. You also have to add a new product dependency for the collections-benchmark to the executableTarget which now should look something like this:
// ... Beginning of file omitted ...

.executableTarget(
    name: "Tutorial",
    dependencies: [
        .product(name: "CollectionsBenchmark", package: "swift-collections-benchmark"),
    ]),

// ... Rest of file omitted ...
To make sure everything worked you can try to build the project by running swift build which should print the following output:
Fetching https://github.com/apple/swift-system from cache
Fetching https://github.com/apple/swift-collections-benchmark from cache
Fetching https://github.com/apple/swift-argument-parser from cache
Fetched https://github.com/apple/swift-system (0.43s)
Fetched https://github.com/apple/swift-argument-parser (0.43s)
Fetched https://github.com/apple/swift-collections-benchmark (0.43s)
Computing version for https://github.com/apple/swift-collections-benchmark
Computed https://github.com/apple/swift-collections-benchmark at 0.0.3 (0.02s)
Computing version for https://github.com/apple/swift-system
Computed https://github.com/apple/swift-system at 1.2.1 (0.02s)
Computing version for https://github.com/apple/swift-argument-parser
Computed https://github.com/apple/swift-argument-parser at 1.2.2 (0.02s)
Creating working copy for https://github.com/apple/swift-system
Working copy of https://github.com/apple/swift-system resolved at 1.2.1
Creating working copy for https://github.com/apple/swift-argument-parser
Working copy of https://github.com/apple/swift-argument-parser resolved at 1.2.2
Creating working copy for https://github.com/apple/swift-collections-benchmark
Working copy of https://github.com/apple/swift-collections-benchmark resolved at 0.0.3
Compiling plugin GenerateManual...
Building for debugging...
[154/154] Linking Tutorial
Build complete! (6.92s)swift build.
Step 2: Writing the Benchmark
It is now time to edit Sources/Tutorial/Tutorial.swift which should contain the following code:
@main
public struct Tutorial {
    public private(set) var text = "Hello, World!"

    public static func main() {
        print(Tutorial().text)
    }
}Sources/Tutorial/Tutorial.swift.
As part of this Tutorial I would like to figure out how long it takes to sort an array of integers by calling sorted on it. In order to measure this you need to establish where the data for the benchmark comes from first. For example, in order to test an array of integers you need to get some arrays in different sizes from somewhere so you can call sorted on them. Luckily there is no need to worry about this for now because swift-collections-benchmarks comes equipped with some default data for integer arrays. So all that is left to do is to write the actual benchmark.
First, import the benchmark package:
import CollectionsBenchmark
Then create a new Benchmark instance in the main method:
var benchmark = Benchmark(title: "Tutorial Benchmark")
This is the handle for all your benchmarks. A new benchmark task can be added by calling addSimple, which for sorting an array of integers would look something like this:
benchmark.addSimple(
    title: "Array<Int> sorted",
    input: [Int].self) { input in
        blackHole(input.sorted())
    }
addSimple is invoked with three arguments. The first argument is the title of the task to be added, which will also show up in the graph output of the executable. The second argument is the type of the input data that will be used for the task. If you remember, I want to benchmark the sorting of an array of integers, which is indicated by passing [Int].self. The third argument is the task closure that contains the actual code to measure the runtime of. The closure will be called with some input data that can used, in this case an array of integers. The input of the closure always corresponds to the input type specified by the second argument of addSimple.
The actual code to measure the runtime of is just a single line:
blackHole(input.sorted())
The input data gets sorted by calling sorted() on it. But what is blackHole? sorted returns a new copy of the input array that has been sorted but there is no need to use the result of that operation anywhere in the benchmark. So the first instinct would be to just write the following:
let _ = input.sorted()
Benchmarks are run in release mode to measure the real-world performance with all possible compiler optimisations enabled. One of those optimisations is trying to figure out whether a return value is used anywhere in the code, and if it isn't, the whole call to input.sorted() could be removed by the compiler. The best way to make a program faster is by removing unnecessary work, which is a great optimisation but defeats the purpose of the benchmark. To prevent the compiler from removing the very thing to measure swift-collections-benchmark comes with a helper function called blackHole. Whenever there is a return value that is not needed it is best to pass it into blackHole. blackHole itself is just a no-op function with an @inline(never) attribute (see source code).
The main method of the benchmark handle will execute all added benchmark tasks and measure their runtime:
benchmark.main()
The full source code of Sources/Tutorial/Tutorial.swift should look something like this:
import CollectionsBenchmark

@main
public struct Tutorial {
    public static func main() {
        var benchmark = Benchmark(title: "Tutorial Benchmark")

        benchmark.addSimple(
            title: "Array<Int> sorted",
            input: [Int].self) { input in
                blackHole(input.sorted())
            }

        benchmark.main()
    }
}Sources/Tutorial/Tutorial.swift.
Step 3: Running the Benchmark
To execute the benchmark run swift run -c release Tutorial run results --cycles 3 which is quite a mouthful. Let me break it down.
swift run -c release Tutorial runs the Tutorial executable in release mode. This will build and run the executable with optimisations enabled. run results --cycles 3 are the command line arguments that are being passed to the Tutorial executable itself. The benchmark executable has multiple modes, one of which is run, which will simply run all the tasks that have been added to the benchmark handle. results is the name of the output file that will be generated by the executable and contains all the collected measurements. You can name this file whatever you want. --cycles 3 means we will run each task with all input values 3 times. When running this you should see the following output:
Running 1 tasks on 76 sizes from 1 to 1M:
  Array<Int> sorted
Output file: /Users/nunya/Xcode Projects/Tutorial/results
Appending to existing data (if any) for these tasks/sizes.

Collecting data:
  1.2.4...8...16...32...64...128...256...512...1k...2k...4k...8k...16k...32k...64k...128k...256k...512k...1M -- 2.29s
  1.2.4...8...16...32...64...128...256...512...1k...2k...4k...8k...16k...32k...64k...128k...256k...512k...1M -- 2.28s
  1.2.4...8...16...32...64...128...256...512...1k...2k...4k...8k...16k...32k...64k...128k...256k...512k...1M -- 2.28s
Finished in 6.85sswift run -c release Tutorial run results --cycles 3.
It took almost 7 seconds for the benchmarks to finish on my machine. So what exactly has happened? The first line indicates that the benchmark executable is running exactly one task: Array<Int> sorted. It runs the task on 76 sizes from 1 to 1M. This means the task closure that contains blackHole(input.sorted()) will be run 76 times with different array sizes as its input. In this case it will be run with an array that contains 1 element up to an array that contains 1 million elements. The various input sizes used can be seen in the collecting data step:
1.2.4...8...16...32...64...128...256...512...1k...2k...4k...8k...16k...32k...64k...128k...256k...512k...1M -- 2.29s
And since I specified 3 cycles the collecting data step will run exactly 3 times. In general it is good to specify at least 3 cycles. This is useful in case one cycle took longer because your machine was doing something else at the time which caused the benchmark to slow down a bit. More cycles usually mean more accurate measurements. I tend to go with 10 cycles but it really is up to you and how different in behaviour the code that you want to measure is between each cycle. If --cycles is not specified the benchmark will run indefinitely until the process is stopped with ctrl + c. Measurements for each finished cycle will be added to the specified output file and subsequent runs will append to the same output file if it already exists. If a clean run is desired you need to make sure to either delete the output file, or choose a different name for the next run.
The sizes for the input array are not fixed from 1 to 1 million. They can be customised by specifying --min-size x and --max-size y where x and y should be replaced with the actual integers you would like to use.
Keep in mind that it is best to run benchmarks on an idle machine. It might be tempting to go and do something else on the same machine while the benchmark is running in the background but that could skew the measurements. The machine should be as idle as possible.
Step 4: Creating the Graphs
The previous run collected all measurements into a file that I called results. To create a graph out of this data the benchmark executable needs to be run in render mode: swift run -c release Tutorial render results default.png. The interesting part are the arguments that get passed to the benchmark executable: render results default.png. This means the benchmark is taking all the measurements in the results data file and creates a graph graphics file default.png. If you open default.png you should see the following:
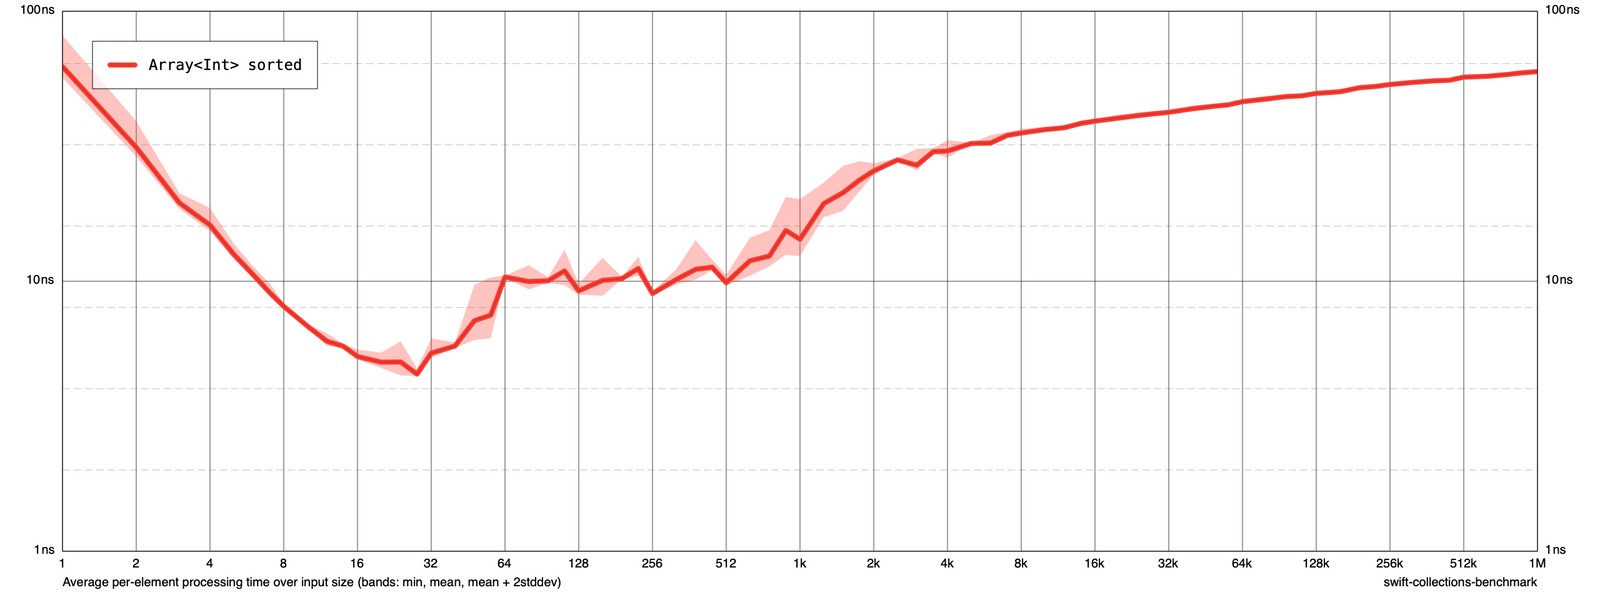
This output might look a bit confusing at first but what this shows is the average time sorted() took on a single item in the input array. For example, on an input array with 64 items sorted() takes on average 10 nanoseconds for each item in the array.
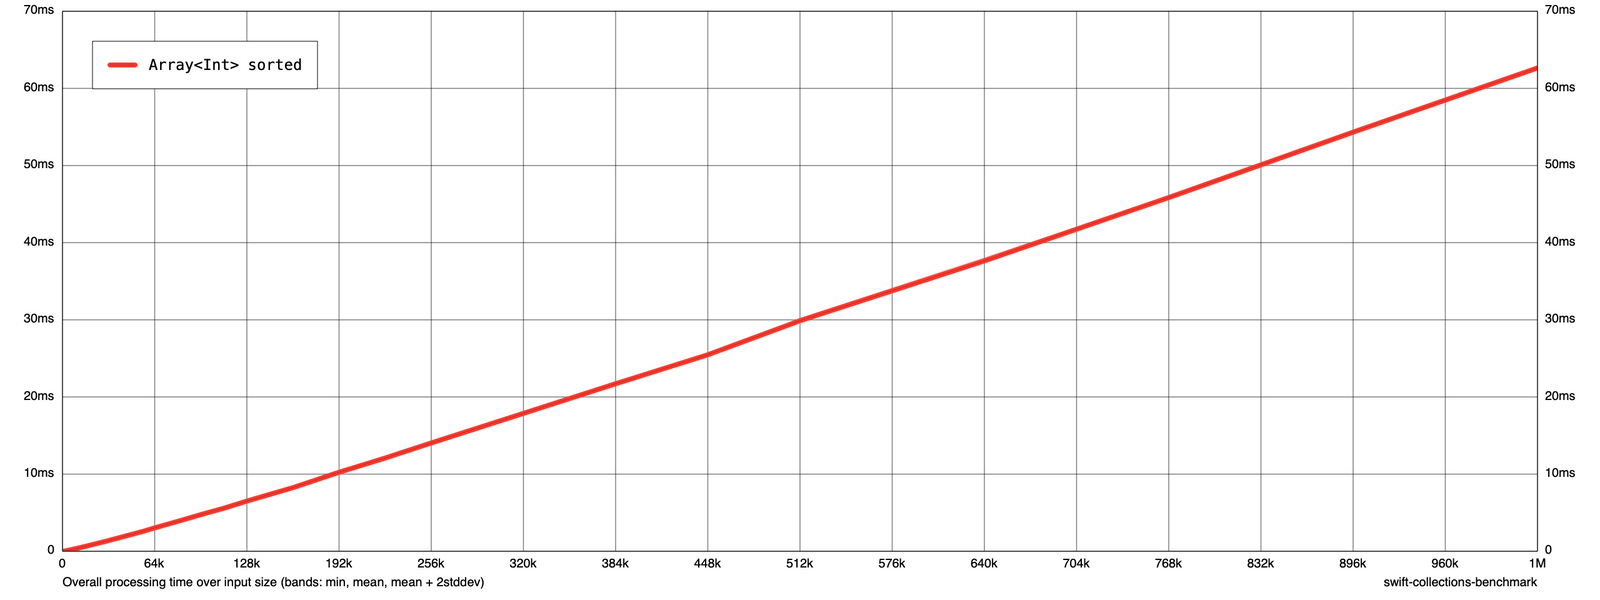
To get the overall runtime of sorted() the graph can be rendered in a slightly different way by calling swift run -c release Tutorial render results -amortized false overall.png. If you open overall.png you should see the following:

This graph now shows the overall runtime of sorted() instead of the average time per item. For example, sorting an array of 16000 items takes close to 1 millisecond.
Sometimes it might help to have the time and input size axis in a linear instead of logarithmic scale. This can be done by passing --linear-time --linear-size to the executable like so swift run -c release Tutorial render results --amortized false --linear-time --linear-size linear.png. This will produce the following output:
There are a lot more options for the graph rendering available which you can find by passing --help to the executable. I will not go into much more detail than this.
One more thing to mention is that if you have multiple benchmark tasks added to the benchmark handle, all would show up on the output graph. This way you can compare the performance of multiple implementations. There is also a way to compare two different measurement data files by using the result compare mode, but this is outside of the scope of this tutorial. Read the corresponding getting started guide section if you want to learn more about comparing results.
Appendix 1: Custom Input Generators
You might be wondering how to write benchmarks that use anything other than integer arrays as input data. For example, I want to measure the runtime of a method that counts all characters in a string like this:
extension StringProtocol {
    public func countCharacters() -> Int {
        var count = 0
        for _ in self {
            count += 1
        }
        return count
    }
}
The benchmark task for this method looks something like this:
benchmark.addSimple(
    title: "String count",
    input: String.self) { input in
        blackHole(input.countCharacters())
}countCharacters.
The task has been registered with String.self as the input type and I would expect input to be a string of varying sizes when I run the benchmark. But when running it in release mode the application traps. When running it in debug mode things become a bit more clear as to what the issue is:
CollectionsBenchmark/Benchmark.swift:88: Precondition failed: Unregistered input type 'String'
The collections benchmark does not work for String types of the box. But luckily there is a way to register custom input generators for any type that is needed.
From now on I am going to pretend that there is a string variable called testString that contains text that is over 1 million characters long. I am going to use this variable for the input generator. To register a custom input generator for a specific type call registerInputGenerator on the benchmark handle:
benchmark.registerInputGenerator(for: String.self) { count in
    let endIndex = testString.index(testString.startIndex, offsetBy: count)
    return String(testString[testString.startIndex..<endIndex])
}
registerInputGenerator takes the type of the generator as an argument. In this case it will be String.self. The second argument is a closure that is responsible for generating the input data. It provides a count which is the requested size of the data that should be returned. For example, for an array this would be the number of elements within the array. For the string I will interpret this count as the number of characters the string should contain. So for a requested count of 64000 the returned string would contain 64000 characters. If you were to run the benchmark now, it would execute as expected.
Appendix 2: Data Files
In Appendix 1 I pretended that somewhere in the program file there is a string variable called testString that contained over 1 million characters. Having input data for benchmarks in the program code might become a bit unwieldy. It might be useful to have this data in an external file that the benchmark is loading on program start. I have added a file named inputFile.txt to Sources/Tutorial/ that contains some random text with slightly over 1 million characters. This input file now has to be included into the package bundle so it can be used by the benchmark. This is done by adding an entry to the resources array in the executableTarget in Package.swift:
.executableTarget(
    name: "Tutorial",
    dependencies: [
        .product(name: "CollectionsBenchmark", package: "swift-collections-benchmark"),
    ],
    resources: [
        .process("inputFile.txt"), // The new input file
]),inputFile.txt to the executableTarget in Package.swift.
To load the inputFile in the benchmark import the Foundation package first:
import Foundation
Then retrieve the url of the file within the current bundle:
guard let url = Bundle.module.url(forResource: "inputFile", withExtension: "txt") else {
    fatalError("inputFile.txt not part of the current bundle")
}
And finally, load the contents of the file into the testString variable:
guard let testString = try? String(contentsOf: url, encoding: .utf8) else {
    fatalError("Couldn't read contents of inputFile.txt")
}
Appendix 3: Task Setup
Sometimes you might want to do something with the current input data of a benchmark that shouldn't be included in the measurements. For example, you need to create a new class instance based on the input data but then only want to measure a different method without the setup overhead. In this example, I am going to take an array of integers as the input, and increment every element by one before calling sorted() on it. I only want to measure the time it takes to sort the array and exclude the time it takes to increment every element by 1. This can be done by calling add instead of addSimple on the benchmark handle:
benchmark.add(
    title: "sorted + 1",
    input: [Int].self) { input in
        let newInput = input.map { $0 + 1 }
        return { timer in
            blackHole(newInput.sorted())
        }
    }
add is similar to addSimple with the exception of the task closure argument. Instead of measuring the code within the task closure it requires it to return a Benchmark.TaskBody which is a closure of (inout Timer) -> Void. The returned Benchmark.TaskBody will contain the actual code to be measured. This means that any code outside of Benchmark.TaskBody can contain some form of setup that will not be included in the measurements. In this example it is incrementing each element of the input array by one:
let newInput = input.map { $0 + 1 }
The returned Benchmark.TaskBody does contain the code to measure the runtime of:
blackHole(newInput.sorted())
The passed timer can be ignored.
Conclusion
These were the basics of writing and executing a benchmark in swift. I hope this tutorial was of value to you and you are now able to write and execute your own benchmarks. If you found any errors or inconsistencies please report them to me.